Wednesday 29 February 2012

GZG First (actually second) Impressions

It's finally time to take a look at Ground Zero Games, the closest thing the 15mm sci-fi scene has to an all-inclusive hobby company. GZG offer a (somewhat aged, but still solid and reasonably popular) 15mm ruleset called Stargrunt II as a free pdf download. They also have a very comprehensive range of figures - I count about 13 different factions in the infantry section as well as a wide selection of generic models, although I would say only 3 factions really have a full range of poses and armament so far (UNSC, NAC and New Israelis). GZG's vehicles aren't really arranged by faction, but they do come in several different, easily distinguishable visual styles, so it is quite possible to create distinct forces.

To be perfectly honest, this is my second order with GZG - the first time I was too excited to take photos as I went along, and I knew I would be making another order soon to round out my force, anyway.


Making an order is very easy. GZG run an online store with proper software, which is sadly still a rarity in the 15mm market. However, keeping with another 15mm tradition, they are extremely stingy with their pictures. Their 15mm vehicle range is well covered, but the infantry pictures are so small as to be just about useless. Some other sections (a lot of the 25mm and 6mm ranges) don't have any pictures at all. I'm probably not the only one who refuses to blind buy, so GZG really should get their act together here.

GZG's international shipping rates are a fair bit above standard. High enough that they would be a deal-breaker for me if the 15mm market were just a little bit larger. A lot of it is down to them insisting on recorded delivery, which is a costly service when shipping internationally. On the upside, my order shipped lightning-fast. I placed it on the 24th in the early morning and received a dispatch notice not 4 hours later. The package followed 4 days later, which must be a new record for UK air mail.


Every set is individually bagged and the lot is then bubble-wrapped for additional safety. This works well for the most part but I wish some additional protection would be provided for some figures with long, very thin metal gun barrels. There were no breakages or significant bending this time, but with the weight of the lead alloy models and the thinness of the barrels, I could easily see them being damaged.


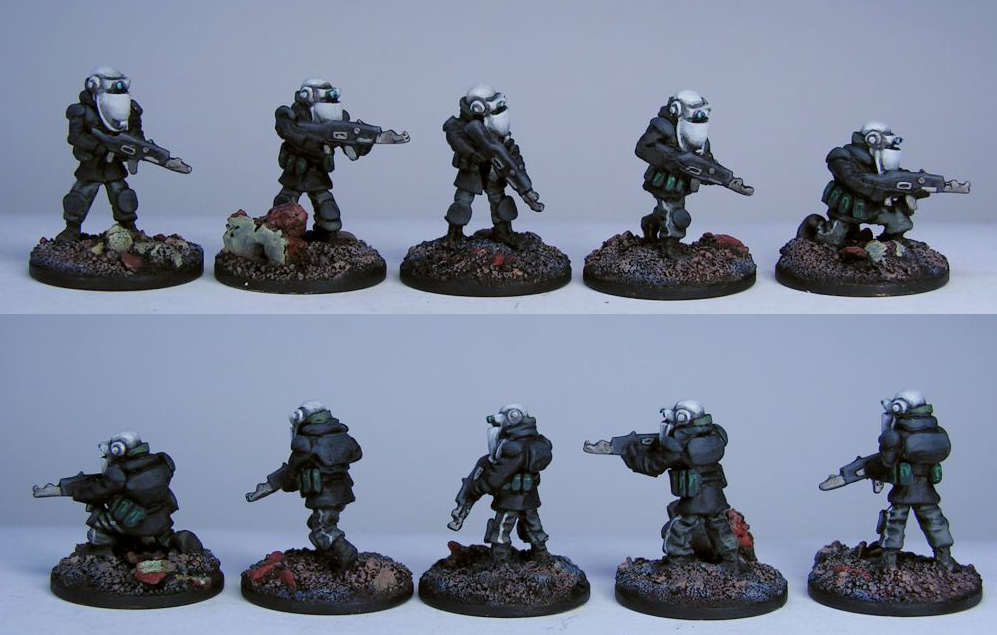
So here we have some New Israelis. The first picture shows a unit of infantry in Hardsuits (same models front and back) although I cannot for the life of me tell how these are any different from any other New Israeli infantry. It's hard to see on the official pic, but you get a guy with a shoulder-mounted weapon of some kind, one guy with a heavy energy weapon, a leader-type, and 5 grunts.


The next picture shows the units, a Rifle pack A and a  Command & Comms pack. Now, keep in mind that these are the only 15mm sci-fi figures I've ever seen in person, and I never paid much attention to the Flames of War models that are popular in my game store, but I'm not very impressed with the sculpting and casting. I think the detail is very soft for its size, and the figures often look a bit "squished" - I don't know whether this is due to poor sculpting or sloppy handling of molds during casting. There is also significant flash present on some figures. See the neck of the guy on the far right of the top row here, and the head of the third guy in the bottom row.


Moving on, here are a pack of Mortar teams and Gauss MG teams. These are all pretty nice.


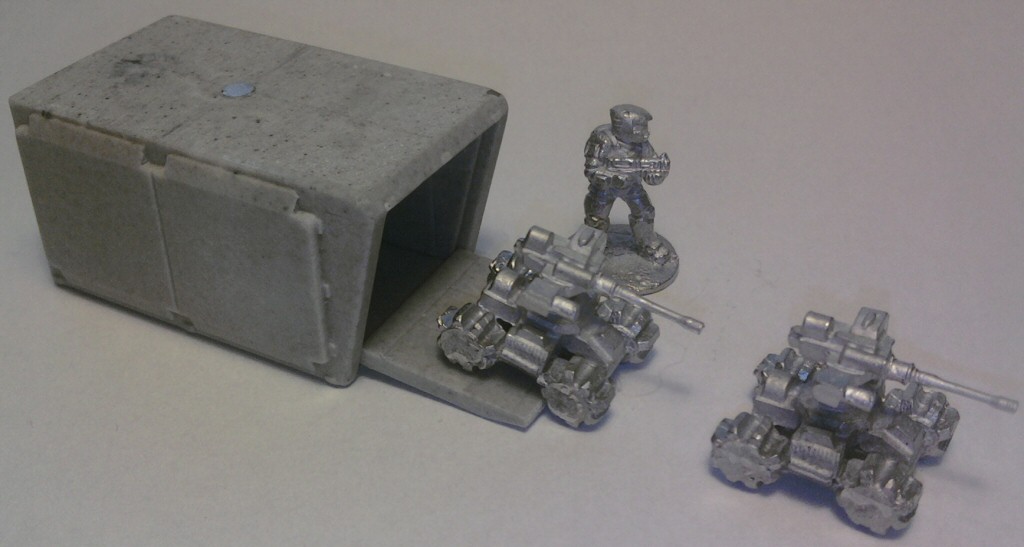
 Besides a load of infantry (9 packs total) I also got some drones. The wheeled missile drones here will supplement my existing autocannon and sensor drones. The casting looks nice from the front, but a look at the backside reveals heavy disfigurement of the rear wheels, probably where the injection ports are. This was the same on my first two batches of drones, so it's probably not an anomaly. It's not too difficult to fix them up, but not exactly my idea of well-spent hobby time.


The spider drones are much better casts and really have no issues apart from plenty of mold lines, but that's to be expected given their complex shape.


Speaking of mold lines, there is a huge gripe I have with GZG's figures. Two sets of mold lines on one figure! You can see this on the super close-up below. The first picture is raw, the second shows where the lines are. The third guy has three mold lines crossing on his head, although you'll have to take my word for it as he's a bit out of focus.


And the same deal here. Four mold lines on each leg! WHYYYYYY? My guess is this: To make some specialists, GZG cast up some basic figures, chopped off their guns and sculpted new ones. This is okay, most manufacturers do it. Even GW used to recycle sculpts all the time back before they shifted to sculpting on the computer. However, I don't recall a single case where GW forgot to remove the original's mold lines before recasting the model. This is inexcusably lazy and creates a huge amount of unnecessary work for every single customer. Shame on you, GZG.


Well, luckily I now have all the New Israelis I'll need for the foreseeable future and I'm ready to explore other companies' ranges. I might give Khurasan a try next time, I really like their Control Battalion.

So, my final ratings for GZG, using the same system I did for Old Crow:

Sculpting 6/10 - great designs, but soft detail and inexcusable double mold lines
Casting 7/10 - heavy mold lines, damage around injection ports, occasional distorted figures
Service 10/10 - same-day dispatch, good packing, proper online store software
Value 7/10 - GZG is one of the pricier 15mm companies, and the quality does not match the cost

GZG's chief advantage is their large figure range. Right now they are still the go-to guys if you want a visually coherent force, but once competing 15mm companies catch up (and they are catching up) in that department, I think GZG will have to step up in terms of quality control or reduce costs (I hear switching to resin is all the rage these days).

Am I being too harsh? Or do you agree? Let me know.

Ta ta!


Tuesday 28 February 2012

Protip: Custom Gaming Tokens

Something I have noticed time and again is that a lot of gamers are refuse to put any money, time or effort into their gaming accessories (aside from dice, in most cases). I know people who eagerly drop hundreds of bucks on miniatures but stubbornly avoid buying or making decent blast templates, objective markers, tokens and similar components and instead use hastily made cardboard cutouts or just borrow from their opponents.

It's even worse if the accessories cannot be easily bought from a hobby shop. This is, I think, also one of the chief causes of many gamers' reluctance to try new gaming systems (even if they don't have to buy any new models) or to design a system of their own. Regardless of how neat a free ruleset they find on the internet is, many people consider it an insurmountable obstacle if the system requires special dice, tokens or templates, even if printable files are included with the ruleset.


So let me show you just how easy it is to create good quality components. Learning to do it can open up whole new vistas of gaming, allowing you to try out all those obscure little wargames you can find online.

First off, you obviously need the designs in electronic format. If printable tokens for your chosen game are available to download, you're already set. Otherwise, you have to design them yourself. This isn't as hard as it sounds if you have any sort of decent image editing program.

If this sounds unappealing, let me remind you that gaming tokens are usually very small. This means that you don't need fancy graphics, in fact it is much better to keep them simple so you can easily tell what's what at a glance. Even using a very respectable 300 dpi (dots per inch) resolution, a 3/4" token will only be 225 pixels to a side. This is small enough to draw pixel by pixel even if you have zero talent.

If you aren't even feeling up to that much, you can borrow graphics from other sources. Google image search is great for this. Searching for "icons", "buttons", "symbols" and "clipart" will usually yield a variety of useful images that just need cropping and resizing.


Another source of simple graphics are fonts. Your computer likely comes with a few fancy font sets by default. You can explore fonts by typing out every letter in a word processor, but it's easier to look them up in the Character Map, where you can easily select the "letters" you want and copy/paste them into your image editor.


Once you have a good selection of images for your tokens, arrange them into a larger image for printing. If you don't have the means to print them nicely at home, take the file to a local print/copy shop and have them printed on a self-adhesive sheet. This costs maybe around a buck and one sheet is plenty for most systems.


Cut out the tokens with scissors or a hobby knife. I prefer the latter as I can make longer cuts swiftly.


Why print on self-adhesive sheets? Because this allows us to glue the tokens to a firmer base, such as cardboard or plasticard (sheet styrene). To save time, I cut my tokens into strips of 4 and glue each strip to an equally sized strip of plasticard. I want double-sided tokens, so I glue another strip on the other side.


I then make the final cuts, separating individual tokens. By doing it this way I make one cut instead of three (two layers of printed sheet and the plasticard in between).


The final product. What you see here is a single afternoon's work, starting from zero. I still have plenty of tokens left to cut later, but for now I have enough finished for a small game. As you can see, printing stickers even allows us to create custom dice on the cheap.


You'll have to excuse me if I don't share this particular set as I have borrowed the icons from many sources, including some commercial image libraries.

Well, that's all for now. I hope I've convinced someone that making tokens at home is very doable and shouldn't be a deterrent to trying new rulesets. Ta ta!

Friday 24 February 2012

Game Theory, part 1: Play Flow

Another little thing I wanted to do here on the blog is talk about game rules and my quest for a 15mm system that would be just right for my own tastes. This article is the first in what I hope will become a regular series. It is intended to focus my own scattered thoughts as well as provide a good starting point for anyone else looking for (or designing!) their perfect system.

One of the most important aspects of a ruleset is certainly play flow. By this I mean the manner in which the rules allow for active player involvement and how that can shift from player to player. In other words, the subject covers such basic concepts as the turn sequence, the method of activating units, and perhaps the most critical question - how long do I have to stand there and watch my opponent take apart my army before I can do something about it?


First, let's look at the most basic mechanic of any system, turn order, and how it is handled in some popular games. There are two very common ways to handle turn order.

The first and by far the most common is the so-called IGOUGO system, in which each player takes a turn using all of his units while his opponent mostly just waits (and removes casualties). When the first player finishes his turn, the other player goes and uses all of his units. There are some obvious benefits to this way of doing things: for one thing, it's relatively easy to keep track of which units have already acted, but more importantly it allows a player to properly coordinate his units and follow a set strategy. The chief drawback seems to be that the other player can easily get bored and lose interest because the game simply isn't engaging him when it's not his turn.

Nuances are possible even within the IGOUGO system. Some games separate a player's turn into several phases and demand that, for example, all units move first, then fire, then fight in melee or whatever. The most prominent examples of these games are GW's Warhammer games and most of their offshots.

The other option is to have players do everything they want with unit at a time before moving on to the next. Typically, these games prohibit a player from going back to a previous unit once he has started to act with another. The most well-known examples here are Warmachine and Hordes from Privateer Press. This is also the default method used in Gruntz 15mm, although there are optional alternatives provided in the rules as well.

A popular alternative to IGOUGO is an alternating activation system. Here, each player only uses one of his units at a time (usually) and then the other player uses one of his. In most of these games, players have to keep track of which units have already acted and they cannot use any single unit again until any units remain that haven't acted yet. This kind of system keeps both players on their toes as play passes rapidly from one player to the other and the battlefield can shift unpredictably. It's also harder to keep track of things and use any coherent strategy as players constantly have to react to their opponents' moves. Popular games in this category include Uncharted Seas, Firestorm Armada and Dystopian Wars, all by Spartan Games, but also GW's Epic Armageddon system for 6mm scale gaming.

Besides these "big two" there are numerous others, less common ways to handle turn order. I'm going to lump some of them together in a broad category I will call reaction systems. These come in many varieties and have been gaining a lot of popularity lately. Their common theme is that, regardless of their basic turn mechanic, they place a strong emphasis on allowing a player to interrupt his opponent and react to his moves as they happen. The most widely known reaction game is undoubtedly Infinity by Corvus Belli. Infinity is a 28mm skirmish game using an IGOUGO system at its core, but every time a model does something on its turn, all enemy models that can see it can react with an action of their own. More relevant to the 15mm scene is Tomorrow's War by Ambush Alley Games, which goes even further. This system is also reminiscent of IGOUGO, but only one player actually takes a full turn while the other may only react (however, if my memory serves me, there are penalties for making successive reactions in Tomorrow's War, unlike in Infinity) and does not necessarily get a proper turn of his own. Then there are also the Chain Reaction system games published by Two Hour Wargames, including 5150, which I am not at all familiar with but judging by the name, they certainly belong here.

Having now familiarized ourselves at least somewhat with the different ways to handle turn order, we can start thinking about how we want play to flow in our game and which turn order method would be most conductive to that.

Do you want to allow each player to form and execute a grandiose plan, coordinating his entire army to attack together? IGOUGO is the best for this kind of thing, but keep in mind that this sword cuts both ways. Will you enjoy watching haplessly while your opponent does the same?

Do you want an unpredictable battlefield where you can still mostly do your own thing, but with less waiting between moves? Alternating activation could be good, as long as you know all your plans could be easily disrupted if your opponent makes a move you do not expect.

And what about reaction systems? Some of the versions I've seen seem like overkill to me, often allowing the reactive player to execute more moves and make more attacks than the player whose turn it actually is! But applied in moderation, reactions could provide a happy middle ground between IGOUGO and alternating activations by allowing the active player to make coordinated maneuvers while still giving his opponent a chance to respond in some way, thus keeping him engaged in the game even when it's not his turn.

There are a few other ways besides turn order to tweak play flow and keep an otherwise inactive player interested in what's going on when he isn't allowed to move figures. One of the core mechanics in Warhammer is the armour save. This is a last-chance roll to avoid damage to a figure, and is always made by the controller of the figure being attacked - so usually the passive player. But why does a roll that represents the chance of a blow being deflected by armour come after the roll made to see if the blow caused a wound? Shouldn't armour come first? The common, and very sensible, explanation for this is that armour saves come last to give the player the feeling that the fate of his troops is ultimately in his own hands. He gets a last chance to save his men, instead of watching the other person roll how many he kills. Statistically it doesn't matter which roll comes first, but the psychological difference is huge and despite being seen as an archaic mechanic by some, plenty of newer games have adopted armour saves (Flames of War and Infinity, for example), probably with much the same reasoning.

Another mechanic that has gained popularity in recent years is the opposed roll. Typically, this means that each player makes a die roll and adds the relevant ability value of his figure, and the player with the higher total score wins. This is an effective method to keep the passive player paying attention, but it can slow the game down and isn't always practical in games where several figures can attack together. It's certainly one to keep in mind if you want to do skirmish games with very few figures per side (Infinity uses opposed rolls almost exclusively, for example).

That's all I can think of so far. I would be very interested in hearing your thoughts on play flow, how other games handle it and your personal preferences.

ADDENDUM
Reader Noel reminded me about a few more options I had initially forgotten.

As he says, in USE ME models are activated in order of skill level. We can consider this an offshot version of initiative systems. In these, units are activated in a certain (predetermined or random) order. Another example I've seen is to assign a playing card to each unit and determine initiative order by drawing the unit cards from a deck that is reshuffled every turn. The end result feels somewhat like alternating activations, but you never know which (and whose) unit will come up next.

Another option that comes to mind could be called a shared phases turn. Here, both players move their units (either at the same time or one after another), then they both shoot, etc. In GZG's Full Thrust, for example, both players secretly write down the movement orders for their ships, then all ships are moved at once.

Thursday 23 February 2012

First thoughts: Tehnolog Power Plant

With a fistful of infantrymen and a couple of vehicles in my collection now, it's time to get some terrain to play on. I recently managed to get my hands on a pair of Power Plant kits from Tehnolog. These are distributed by Pegasus Hobbies in the US, but until a few weeks ago had been completely unavailable in Europe. Luckily Wayland Games (a large UK online discounter) picked up the line, along with the already well-known Platformer and Hexagon sets.

Okay, so let's check out the goods. For £11.69 (after discount) you get a pretty hefty box.


Inside are 6 sprues (and room enough for at least two more, but what can you do).


You get two of these. These parts clip together to form the main structural pillars of the set.


You also get two of these sprues (they're identical, just shot from different sides). These are absolutely packed with interesting techy parts, pipes, riveted domes, cogs, vents... I get all sorts of neat terrain ideas just looking at these.


Lastly, the box contains a sprue of walls and a sprue of floors. Oh, there's also an instruction sheet with a list of parts and some suggested layouts. This set isn't nearly as flexible as Platformer and Hexagon are as far as the layout of the walls and floors goes, as there just aren't enough differently shaped pieces. The main variation comes from arranging the piping.


This is how the main elements slot together. The pillars can be stacked nicely and the walls slot into the side slots. This all works well without any glue.


And a few test fits of the pieces. The wall construction is honestly kind of bland and looks impractical for 15mm soldiers to crawl around in, but the boiler thing looks great.  I think I'll build some industrial scenery for 15mm using the pipes, boilers and other interesting parts, but save the walls and floors for something more skirmish-y, like Necromunda or Infinity.


For the cost this isn't a bad set to buy and it has some absolutely amazing and unique pieces, but I don't think the walls and floors are all that great for 15mm gaming. If that's all you play, or if you prefer having a lot of platforms for your guys to crawl over, you should consider getting some Platformer or Hexagon instead.

That's all for now. Happy gaming!


Tuesday 21 February 2012

Modeling update: Crow Lander

It's time to take a few pictures of my almost finished Crow Lander. The land vehicles have been covered already but I left the dropship for last because I could see right away that it's going to be a fair bit trickier to put together.

The main cause is the join between the front and back half of the fuselage. As with all Old Crow pieces, the surfaces were sanded perfectly flat, but unfortunately at a slight angle. This meant that the assembled hull seemed to curve slightly to the left (when viewed from the back). I solved this by putting a blob of ProCreate putty between the pieces and aligned them properly. When the putty cured, I filled in the rest of the gap with more ProCreate, as well as some Vallejo Plastic Putty (by the way, I'm not paid to drop product names, I do it for the benefit of readers who might be unaware that such materials and tool exist). I didn't get it absolutely perfect, but at least now the curve is slight enough not to be obvious at a casual glance.


Another thing I did early on was to clip away the rather unimpressive chin gun and replace it with a spare gatling gun that came with one of Old Crow's tank turrets. I pinned the new barrel and fixed the gaps with ProCreate.


A view from the front reveals the downward slope of the wings. The mounting spots have a bit of flexibility, so to get the angles symmetrical I bonded all the pieces with ProCreate and a bit of superglue. Before anything cured, I made sure the ends of both wings were resting on the floor at a right angle.


To add some potential flexibility to the lander's loadout I decided to magnetize the cargo compartment. After unsuccessfully trying a few other methods I ended up just drilling a 6mm hole in both ends and placing a single rare earth magnet in each (I initially wanted to avoid doing it this way because there was no surefire way to align the holes. Luckily I got it right.)


The cargo compartment itself is pretty neat, it's actually hollow and the ramp can be glued closed or opened (although the latter option would be uncomfortably fragile, I think). The size is nice, it could believably fit 10 soldiers in full gear, although they would not be very comfortable. It's also a good fit for two of these GZG drones.


A view without the cargo pod. I used a thin piece of plasticard (0.3mm, I think) to cover up the raw sanded backside of the cockpit piece. The lander looks reasonably airworthy without the pod and is slightly reminiscent of the Carryall from the old Dune games. You can also see the metal thruster bits here - I'm not quite sure why these were made in metal; I imagine it has more to do with balancing the mass of the model than with adding any real detail compared to casting the same thing in resin.


Finally, a scale shot with a GZG infantryman and an Old Crow Slingshot AFV. The lander straddles a happy middle ground between being unrealistically small and impractically large. If it were up to me, I would make the cockpit a little bit smaller (it's unnecessarily roomy) and the cargo compartment a bit larger.


That's it for now. I initially felt like this model needed a fair bit of effort to get right (and I still have some gap filling left to do) but then I realized this is mostly due to the rest of the Old Crow line requiring waaay less work than your typical resin model while the lander is just about average in that respect. I can still heartily recommend Old Crow, lander included, to anyone interested in building a 15mm army.

Thursday 16 February 2012

Alternative miniatures: Tehnolog ASTROID

There are a fair few dedicated 15mm sci-fi manufacturers out there already, and new ones seem to be springing up rapidly, but it never hurts to look around a bit, you might find an unexpected gem.

The Russian company Tehnolog should be pretty well known by now. They've made a name for themselves in 40k circles with their Robogear range, which many Ork and IG players use as a basis for conversions and scratch-builds. They also manufacture excellent and well-known modular terrain kits such as Platformer, Hexagon, and the famous Chemical Plant, which are distributed outside Russia under the brands Imex, Conflix, Pegasus Hobbies and others.

Lately the company has received some attention from the 15mm crowd due to their ZOD range of mecha, tanks and infantry, which are advertized on eBay as being in the correct scale for 15mm gaming. There has been some controversy surrounding this and some accusations that their infantry is a copy of old GZG sculpts. You can read up on these subjects here, here and here.

But besides ZOD there is another range of mecha produced by Tehnolog that might be interesting for 15mm. I stumbled upon them by chance when looking at ZOD stuff (which I ultimately decided not to purchase) and they looked interesting and cheap enough to take a chance on.

You can see from the eBay listing that the mecha are humanoid and relatively small, but the detail seems good. There are 16 different ones in the pack and they come on little individual sprues in 4 parts - main body, two arms and a backpack. Each model comes equipped with a ranged weapon, and these are also all different.

So, about two weeks after making the payment (17 with shipping for 16 models!) a little box from Russia turned up on my doorstep. The contents are exactly as advertised. 16 little sprues, half red, half blue. We'll skip over the thrilling process of cutting the bits loose and go straight to what everyone wants to see: scale shots.


Here they are next to a GZG New Israeli. They're small, but I think it would not be unfeasible for a human to stand or sit in the torso, especially with the bulkier models. 


The bits have holes and pegs for the attachment of arms and backpacks, and these are firm enough not to require any glue. The arms attach at the shoulder and can be rotated up or down, which is really the only posing option here. Unfortunately the legs come attached and are all posed in the same rigid stance.

Here are two more variants with an Old Crow  Slingshot...


 ...and a Claymore.


Personally I really like these little mecha and look forward to painting and using them. The only problem I have is that all 16 are different, and I would prefer a few uniform squads, as would probably most others. But maybe some arrangements can be made with that eBay seller?

To round off the photo session, here are the last 8 mecha. Each of the 16 features exactly once in the blog post, giving you a chance to check them all out. I really like the red one in the last picture with the cross-shaped visor. Obviously it must be called the Crusader.


As for the quality of the plastic, it's sort of the middle of the pack. Far more brittle than GW's, but not quite as bad as the cheapest military kits from the likes of Italeri or Revell. I managed to get everything off the sprues in one piece, including all the guns, some of which have quite thin barrels and cables.

I think these are great value for money and I might buy 2-3 more batches just to make a few squads of identical mecha. Of course, another great solution would be to get other local players to each buy one set, and trade with them.

Well, that's all for today. Ta ta!

Wednesday 15 February 2012

Old Crow second impressions

So here is a little follow-up to the last article now that I am done assembling the three ground vehicles.

Upon closer inspection I found a few more tiny bubbles, but not nearly enough to change my opinion that these are the best resin casts I have ever seen. I filled those up with some Procreate putty, which is a lot like green stuff but less sticky and easier on the eyes. You can see where I fixed a bubble on the hubcap of the Claymore's front wheel in the first picture. I also included a GZG New Israeli guy for size reference - I will share my thoughts on that model range in a later post.


The Slingshots also needed a few bubbled filled, but otherwise went together without a hitch. 


Size comparison. The Claymore is quite a beefy vehicle compared to the Slingshot.


It is worth noting that there is a substantial size difference between the two Slingshot casts I got, as I was surprised to find when I tried matching the top and bottom hulls together. I would say one is roughly 1.5mm longer, enough to be obvious at a glance if I were to match the wrong hull parts together. Luckily each bottom part matches its corresponding top part perfectly.


And a scale shot with one of my Space Marines to give the GW crowd some idea about the size of these minis.


All in all I am still very happy with these kits and look forward to receiving my next order. When it arrives, you can expect similar a similar review of the following models:

Sabre Heavy Tank (Grav)
Lancer Heavy APC (Grav)
Gladius Medium Tank (Grav)
Glaive Medium APC (Grav)
Trojan Light APC (Wheeled)
Outrider Scout Vehicle (Grav)
Goanna Scout

Wow, that'll be almost the entire range then, won't it? What can I say, when I get into something, I go all the way.

Stay tuned, there will be another interesting review tomorrow. Ta ta!


Tuesday 14 February 2012

Old Crow first impressions

 Now with actual content!

When I got home from work today there was a little package waiting for me from Old Crow. Let me share my thoughts while the parts soak in detergent.

First of all, I made my order on the 23rd of January, so it took a lengthy 22 days to arrive, even considering international shipping. I would say it took Old Crow about 2 weeks to dispatch the order. Now, the website does have a notice on it saying that orders take longer than usual to process, so it wasn't really a surprise, but it didn't make waiting any easier!


Okay, so all the parts are packaged quite nicely. Every vehicle and turret comes in its own little ziploc bag and there's plenty of bubble wrap around it all, leaving no room for bits to slide around the box. There are four vehicles in the box - two Slingshot AFVs, a Claymore APC and a Crow Lander.

The picture below shows the contents of one Slingshot baggie. The hull consists of a top and bottom piece and the wheels are all separate. I'm guessing Old Crow mostly use one-sided molds, but unlike some other companies, all the parts come pre-sanded. As an additional nice touch, the missile turret comes with two styles of missile pod.


The quality of the casting is outstanding here. The details are, for the most part, very sharp, and defects practically non-existent. In fact, I can say with no doubt in my mind that these are the best resin casts I've seen in 15 years of tabletop wargaming.


The two halves of the hull fit together perfectly (I hope you're taking notes, Spartan Games!)


 The other Slingshot was just as nice as the first, so we'll skip it except for the turret. I wanted to try as many options as I could, so I ordered different turrets. This is the "support" variant and it comes with two sets of metal barrels that fit into the recesses on the resin turret perfectly. The turret ring has a small air bubble, the only irregularity I noticed so far.


The Claymore is a bit beefier than the Slingshots, but funnily enough the hull is a single piece. A few more bubbles here in the left corner, but luckily all on the underside. We also see another turret variant, this one with three different metal barrel options.


The bits of flash seen between the wheel slots here are the only flash present on any of the models.


Lastly we come to the Crow Lander. This is hybrid resin/metal model and the only one I can see myself having some problems with. I do not look forward to attaching the heavy metal wings to the resin hull.


Additionally, the cockpit piece seems to have suffered a little bit of shrinkage. Probably not enough to be noticeable on the tabletop, but slightly annoying nonetheless.


My final ratings (I am making up the categories as I type) for Old Crow:

Sculpting 9/10 - sharp lines, great style; 7/10 for the Crow, which I find it a little bit boring
Casting 10/10 - hands down the best resin casts I have ever seen
Service 7/10 - no real problems, but a tad slow
Value 10/10 - Old Crow have some of the cheapest 15mm vehicles on the market and reasonable international shipping rates; low price combined with outstanding quality is a rare sight these days

How can I best sum up my opinion of Old Crow? Let me put it this way. Once I hit Publish on this article, I will go rinse the models, then I will log onto the Old Crow website and put in another order. Ta ta!